I received Wise Owl Chalk Synthesis Paint in exchange for a review. All opinions are 100% mine.
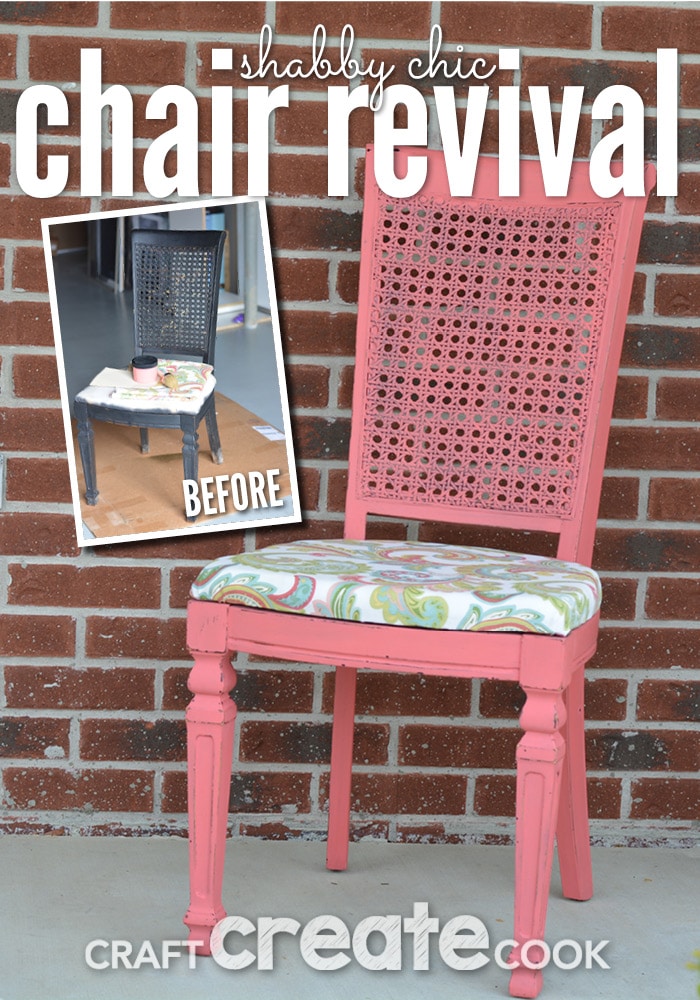
I love all of the DIY shabby chic projects that are popular today! And this chair revival is a perfect, and easy tutorial using amazing Wise Owl Chalk Synthesis Paint.
Chalk like paint. It took me a long time to even know what it was. I thought it was Chalkboard paint. The thought of having a wall, that my children can color on sounded fun. Until the mom in me thought about chalk dust covering the base board and having to teach a toddler that you can't write on ALL walls, but only THIS wall. Chalkboard paint is nothing like the paint I'm talking about. So now that I've filled your head with that image, you can erase it (and cough from the chalk dust!)
In a nutshell, Wise Owl Chalk Synthesis Paint is this amazing paint you can literally paint onto anything with minimal surface prep. The other added bonus is the paint really has no smell, so using my dining room table as a paint space is 100% possible and the entire house will not smell like paint. This makes me feel better about my kiddos, too! It dries fast and the colors are amazing!
I found this chair on the side of the road one day when it was sprinkling. I was in need of another chair, because I moved and now had a place for my craft castle. So I pulled over and saved it from the side of the muddy road. And then it sat in my basement for months. Until last week.
I grabbed some fabric on sale at Hobby Lobby and started to dive into my project. My goal was to create a shabby chic chair that I would love. It's not a hard project, but can take a day or three depending on how much time you have to work on it.
I began by gathering a few supplies, most of which I had on hand:
- Flat screw driver
- Phillips screw driver
- Pliers (flat or needle nose)
- Scissors
- Sharpie
- Fabric
- 400 grit Sandpaper
- Staple Gun with ⅜" staples. This is my FAVORITE staple gun and it comes with an assortment of staples.
- 1" x 15" x 17" foam for my seat cushion *seen note below. Make sure you measure your seat cushion.
- Wise Owl Chalk Synthesis Paint in Begonia Color
- Wise Owl Furniture Wax in Clear
- Round Paint Brush
You have to assess each piece of furniture you find before deciding to refinish it. There are some great tips on what to use to remove furniture wax and built up goo on the wood here. My chair had been spray painted black and had some mud from sitting on the side of the road and dust and cobwebs on it. I wiped those off with a damp rag and began working.
I began with the seat cushion:
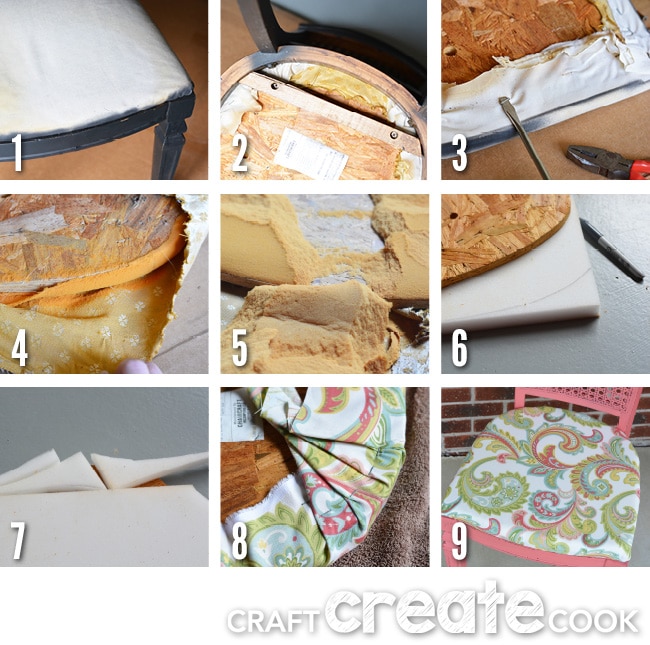
Figure 2. Flip over your chair and use your Phillips head screw driver to remove the seat cushion of the chair and set aside.
Figure 3. Use a flat screw driver to pry the existing staples out of the seat cushion to remove the chair covering. I was lucky to have two layers of fabric! Use pliers if one end of the staple gets stuck and won't come out.
Figure 4-5. I could see the foam on my seat cushion was toast, old and rotted. I removed that as best as I could and discarded it.
Figure 6. Take your new foam and place the wood from your chair on top of it. Trace around it with a sharpie and then cut the foam to fit the chair.
Figure 7. If you're like me, you failed to measure the chair pad before purchasing the foam. If that's the case, you'll need to use the scrap peaces to cover the chair board. Mine sat in the back, so no one would feel it anyhow.
Figure 8. Use a staple gun with staples to put the new fabric onto the chair. Hold the fabric tight, but be careful not to stretch it. Start by tacking the top, bottom, left and right side of the fabric with a few staples. Then go back and staple the corners until you're finished. Overlap to create some "pleats" in the corners. Trim excess fabric as necessary.
Figure 9. Use the screws that were in the chair bottom and put the chair back together when you're ready!
Once the seat cushion was finished, I moved onto the chair itself:
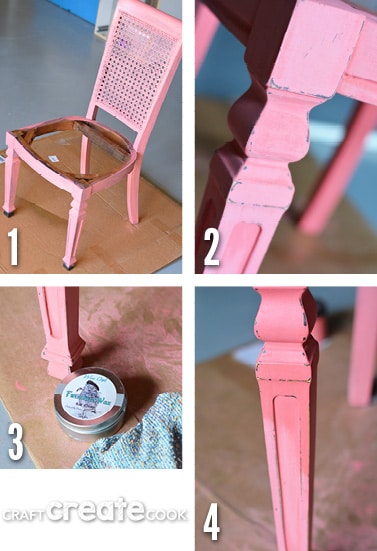
Figure 1. Begin to paint your chair by applying a little bit of paint to your brush. Don't immerse the brush, a little goes a long way. Continue until the entire piece is painted and let dry completely. Mine took about an hour. I applied another coat and before I began to sand it.
Figure 2. Sand your piece with 400 grit sandpaper. Start lightly as pressing too hard can easily remove too much paint! It didn't take long for me to see the black spray paint and then the raw wood under that. When you are happy with your sanding, wipe away the excess dust with a soft, lint free cloth (an old tee shirt works great!)
Figure 3-4. Now it's time to wax! This is when the color really comes out! I used the HQ Pure Bristle Round brush to apply my clear wax. You can see the color and shine in Figure 4! It's just beautiful! Buff the wax with a lint free towel or old, clean tee shirt. If you feel like you need another coat, add one, It's smooth and makes me happyl! It's the perfect shabby chic chair for my home! I am so excited that I want to do another project with Wise Owl Chalk Synthesis Paint!
I used to be afraid of chalk like paint and wax. It was simply because I didn't understand the product. Some things I learned -- 400 grit sandpaper is essential. You can use a rougher sand paper (300 or 220) but be very careful as you'll probably end up taking too much off. You don't have to sand it and distress it for that shabby chic look. You can just paint it and wax it and be okay with it!
You'll also love these two easy projects!
P.S. I was not compensated by anyone to create this project. All views and opinions are my own and I stand behind this great product, in fact, I won't endorse a product unless I believe in it.




Leave a Reply